線形回帰のカーネルトリック
前提
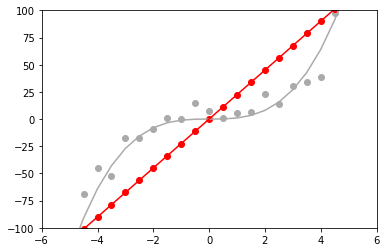
関数は以下のものにノイズを加える
$$ y=x3+\epsilon $$
見ての通り線形回帰だとうまくいきそうにないのでガウシアンカーネルで回帰を行う
また、コスト関数には誤差の総和を用い解析的に解く
まずは線形回帰
import numpy as np
import matplotlib.pyplot as plt

size = 25 #サンプル数
x = np.linspace(-6, 6, size)
y_truth= (-0.05 * x ** 4) + ( 0.1 * x ** 3) + (-0.5 * x ** 2) + (0.6 * x )
np.random.seed(0)
y_noise = y_truth + np.random.randn(size) * 10.0

plt.plot(x, y_truth, color='#aaaaaa')
plt.scatter(x, y_noise, color="#aaaaaa")

w = (1 / np.dot(x, x) * x).dot(y_noise)
y_predict = w * x
plt.plot(x, y_predict, color="r")
plt.scatter(x, y_predict, color="r")

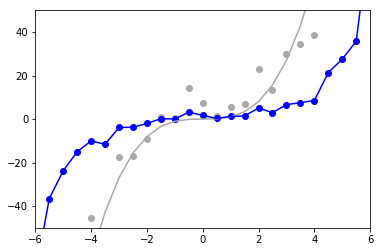
次に正則化していないカーネル
import numpy as np
import matplotlib.pyplot as plt

size = 25 # サンプル数
x = np.linspace(-6, 6, size)
y_truth= x**3

np.random.seed(0) # ノイズ固定
y_noise = y_truth + np.random.randn(size) * 10.0

# 本来のデータ
plt.plot(x, y_truth, color='#aaaaaa')
plt.scatter(x, y_noise, color="#aaaaaa")

# ガウシアンカーネル
def kernel(x1, x2, beta=1.0):
    return np.exp(- beta * (x1 - x2)**2)

# グラム行列
K = np.zeros((size, size))
for i in range(size):
    for j in range(size):
        K[i,j] = kernel(x[i], x[j])

# 解析計算
alpha = np.linalg.inv(K) * y_noise

# 計算したパラメータをもとに予測
y_predict_kernel = np.zeros(length)
for _x, a in zip(x, alpha):
    y_predict_kernel += a * kernel(_x, _x)

# プロット
plt.plot(x, y_predict_kernel, color="b")
plt.scatter(x, y_predict_kernel, color="b")
plt.xlim([-6,6])
plt.ylim([-50, 50])

予想通りぐちゃぐちゃ
正則化を行って計算
size = 25 # サンプル数
x = np.linspace(-6, 6, size)
y_truth= x**3

np.random.seed(0) # ノイズ固定
y_noise = y_truth + np.random.randn(size) * 10.0

# 本来のデータ
plt.plot(x, y_truth, color='#aaaaaa')
plt.scatter(x, y_noise, color="#aaaaaa")

# ガウシアンカーネル
def kernel(x1, x2, beta=1.0):
    return np.exp(- beta * (x1 - x2)**2)

# グラム行列
K = np.zeros((size, size))
for i in range(size):
    for j in range(size):
        K[i,j] = kernel(x[i], x[j])

# 解析計算 (アルゴリズム的にはここに単位行列を足しただけ)
alpha = np.linalg.inv(K + np.identity(size)) * y_noise

# 計算したパラメータをもとに予測
y_predict_kernel = np.zeros(length)
for _x, a in zip(x, alpha):
    y_predict_kernel += a * kernel(_x, _x)

# プロット
plt.plot(x, y_predict_kernel, color="b")
plt.scatter(x, y_predict_kernel, color="b")
plt.xlim([-6,6])
plt.ylim([-50, 50])

正則化項が働いて多少汎化された。
それで
モデルを通常の線形パラメータとは違うものに置き換えていることや、ガウシアンカーネルの次元数が無限にあることにより、正則化による影響が直感的にわかりにくいけど、うまくはいっているみたい。
Anaondaを入れる流れ(Windows 8.1)
複数のサイトで解説されているけど自分用に書く。
現状でTensorflowはPython 3.6に入らないようなので、3.5の環境を作ってそこにいろいろぶっこむ。
通常のPythonインストーラからやろうとすると、matplotlib、scipyのインストールあたりで詰まって面倒だからAnaconda助かる。
環境
- Windows 8.1
- Anaconda3 (4.3.1 : 64bit)
- Python3.5
- numpy
- scipy
- matplotlib
- pandas
- scikit-learn
- tensorflow
Anacondaの導入
- まず、ダウンロードする。
Download Anaconda Now! | Continuum - インストールは特に注意点は特になし。
Python3.5の環境作成
コンソールから新しい環境を作る
> conda create -n [環境名] python=3.5 anaconda
Python3.5の環境に移行する
> activate [環境名]
諸パッケージのインストール
scipy, numpy, matplotlib,pandas,scikit-learnをインストールする。
ただ、conda createで環境を作った時点でインストールされていたので、実際に以下のコマンドは実行しなかった。
> conda install numpy scipy matplotlib pandas scikit-learn
tensorflowをインストール
最新のパッケージはInstalling TensorFlow on Windows | TensorFlowのURLを参照。
今回は現状のCPU最新版を使う。
> pip install --ignore-installed --upgrade https://storage.googleapis.com/tensorflow/windows/cpu/tensorflow-1.1.0-cp35-cp35m-win_amd64.whl
Visual Studio Code
VS CodeはCtrl+F5での実行と入力補完が特に設定しなくてもできるから便利。 設定は、3.5環境のパス設定とlintの無効化をしたぐらい。
[
"python.pythonPath": "C:/……/Anaconda3/envs/tensor/python",
"python.linting.enabled": false,
]
開いているタブをMarkdownのリンク形式でクリップボードにコピーするChromeエクステンションを作ったけど既にあった
タイトルの通り
公開したものの意味が無いので、
ハイパーリンクをコピーする機能などを追加して付加価値を作りたい
Chrome
Copy this tab as Markdown Link - Chrome ウェブストア
プレビュー

いくつかの環境下でのgitbook
gitbookを試してうまく行ったりしなかったりしたので,どこで詰まったかを書いておく.
やりたかったことは,
- npm で gitbook-cliのインストール
- gitbook initでgitbookのダウンロード
- book.jsonを作成し,pluginとしてmathjaxを追加
- gitbook installでbook.jsonを参照してmathjaxをインストール
- gitbook serveでlocalhost:4000を公開しプレビュー.最悪gitbook buildができればいい.
前提としてnodejs v4をインストール済みとする.
またwindowsにはVisualstudio2015とC++をインストール済みである.
Ubuntu 14.04
すべてうまくいった
CentOS7 (Windows10のVirtualBox上)
mathjaxのインストールに成功したが,
サーバがlocalhostなため,ホストコンピュータからアクセスできない.
railsとかなら--bind=0.0.0.0でいけるんだが,それに相当するオプションが見つからなかった.
Bash on windows (Ubuntu)
mathjaxのインストールもできたが,サーバが起動しない.
$ gitbook serve
Error: watch /mnt/c/gitbook/book.json EPERM
Windows10
サーバの起動まではいったが,mathjaxのインストールに失敗.
$ gitbook install
このソリューション内のプロジェクトを 1 度に 1 つずつビルドします。並行ビルドを有効にするには、"/m" スイッチを追加してく ださい。
C:\Program Files (x86)\MSBuild\Microsoft\VisualStudio\v14.0\CodeAnalysis\Microsoft.CodeAnalysis.targets(219,5): error M
SB4175: タスク ファクトリ "CodeTaskFactory" をアセンブリ "C:\Program Files (x86)\MSBuild\14.0\bin\Microsoft.Build.Tasks.Core.dll" から読
み込めませんでした。プロセスを開始するのに使用される環境ブロックの長さは、65,535 バイトを超えて指定することはできません 。  ユーザーの環境ブロックの長さは 1861438 バイトです。  環境変数のいくつかを削除して、もう一度実行
してください。 [C:\gitbook\node_modules\contextify\build\contextify.vcxproj]

Error: contextify@0.1.15 install: `node-gyp rebuild`
Exit status 1
contextifyをnpmでインストールすることを試みるも失敗.
npm install contextify
このソリューション内のプロジェクトを 1 度に 1 つずつビルドします。並行ビルドを有効にするには、"/m" スイッチを追加してください。
  contextify.cc
  win_delay_load_hook.c
C:\Program Files\nodejs\node_modules\npm\node_modules\node-gyp\src\win_delay_load_hook.c(34): error C2373: '__pfnDliNot
ifyHook2': redefinition; different type modifiers [C:\gitbook\node_modules\contextify\bu
ild\contextify.vcxproj]
  C:\Program Files (x86)\Microsoft Visual Studio 14.0\VC\include\delayimp.h(134): note: see declaration of '__pfnDliNot
  ifyHook2'
gyp ERR! build error
gyp ERR! stack Error: `C:\Program Files (x86)\MSBuild\14.0\bin\msbuild.exe` failed with exit code: 1
gyp ERR! stack     at ChildProcess.onExit (C:\Program Files\nodejs\node_modules\npm\node_modules\node-gyp\lib\build.js:276:23)
gyp ERR! stack     at emitTwo (events.js:87:13)
gyp ERR! stack     at ChildProcess.emit (events.js:172:7)
gyp ERR! stack     at Process.ChildProcess._handle.onexit (internal/child_process.js:200:12)
gyp ERR! System Windows_NT 10.0.14393
gyp ERR! command "C:\\Program Files\\nodejs\\node.exe" "C:\\Program Files\\nodejs\\node_modules\\npm\\node_modules\\node-gyp\\bin\\node-gyp.js" "rebuild"
gyp ERR! cwd C:\gitbook\node_modules\contextify
gyp ERR! node -v v4.4.7
gyp ERR! node-gyp -v v3.3.1
gyp ERR! not ok
npm ERR! Windows_NT 10.0.14393
npm ERR! argv "C:\\Program Files\\nodejs\\node.exe" "C:\\Program Files\\nodejs\\node_modules\\npm\\bin\\npm-cli.js" "install" "contextify"
npm ERR! node v4.4.7
npm ERR! npm  v2.15.8
npm ERR! code ELIFECYCLE

npm ERR! contextify@0.1.15 install: `node-gyp rebuild`
npm ERR! Exit status 1
npm ERR!
npm ERR! Failed at the contextify@0.1.15 install script 'node-gyp rebuild'.
npm ERR! This is most likely a problem with the contextify package,
npm ERR! not with npm itself.
npm ERR! Tell the author that this fails on your system:
npm ERR!     node-gyp rebuild
npm ERR! You can get information on how to open an issue for this project with:
npm ERR!     npm bugs contextify
npm ERR! Or if that isn't available, you can get their info via:
npm ERR!
npm ERR!     npm owner ls contextify
npm ERR! There is likely additional logging output above.

npm ERR! Please include the following file with any support request:
npm ERR!     C:\gitbook\npm-debug.log
パッケージ apache2-threaded-dev が見つかりません [ubuntu 14.04]
環境
- Ubuntu 14.04
結論だけ最初に書く
以下のようにコマンドを打つとうまくいった。
sudo apt-get install apache2-dev
流れ
Rails4.2をapache2で動かそうとしていた。そのために、モジュールであるpassengerをインストールしようとしていた。
passengerのインストールをgemで行ったあと、インストールコマンドをうった
$ gem install passenger
$ passenger-install-apache2-module
すると以下のように必要なパッケージを提示された。
Checking for required software...

 * Checking for C compiler...
      Found: yes
      Location: /usr/bin/cc
 * Checking for C++ compiler...
      Found: yes
      Location: /usr/bin/c++
 * Checking for Curl development headers with SSL support...
      Found: yes
      curl-config location: /usr/bin/curl-config
      Header location: /usr/include/curl/curl.h
      Version: libcurl 7.47.0
      Usable: yes
      Supports SSL: yes
 * Checking for Zlib development headers...
      Found: yes
      Location: /usr/include/zlib.h
 * Checking for Apache 2...
      Found: yes
      Location of httpd: /usr/sbin/apache2
      Apache version: 2.4.18
 * Checking for Apache 2 development headers...
      Found: no
 * Checking for Rake (associated with /home/kouki/.rbenv/versions/2.3.1/bin/ruby)...
      Found: yes
      Location: /home/kouki/.rbenv/versions/2.3.1/bin/ruby /home/kouki/.rbenv/versions/2.3.1/bin/rake
 * Checking for OpenSSL support for Ruby...
      Found: yes
 * Checking for RubyGems...
      Found: yes
 * Checking for Ruby development headers...
      Found: yes
      Location: /home/kouki/.rbenv/versions/2.3.1/include/ruby-2.3.0/ruby.h
 * Checking for rack...
      Found: yes
 * Checking for Apache Portable Runtime (APR) development headers...
      Found: no
 * Checking for Apache Portable Runtime Utility (APU) development headers...
      Found: no

Some required software is not installed.
But don't worry, this installer will tell you how to install them.
Press Enter to continue, or Ctrl-C to abort.

--------------------------------------------

Installation instructions for required software

 * To install Apache 2 development headers:
   Please install it with apt-get install apache2-threaded-dev

 * To install Apache Portable Runtime (APR) development headers:
   Please install it with apt-get install libapr1-dev

 * To install Apache Portable Runtime Utility (APU) development headers:
   Please install it with apt-get install libaprutil1-dev

If the aforementioned instructions didn't solve your problem, then please take
a look at our documentation for troubleshooting tips:
これに書かれているようにapache2-threaded-devをインストールしようとしたところ、タイトルのようなエラーが出力された。
パッケージ apache2-threaded-dev が見つかりません
以下のようにコマンドを打つとうまくいった。
sudo apt-get install apache2-dev
最初からこう書いてほしかった。
WebAggでグラフ描画
Vagrantを使ってMatplotlibを使いたい。こういう場合はJupyterを使ってブラウザ上でグラフをインライン表示すればいいのだが、まとまったコードを書きたかったので、そういう用途でもグラフ表示できないかと考えた。 デフォルトのグラフ出力方法にWebAggというものがあったので、それを使ってみることにした。
環境
- VirtualBox 5.0.24
- Vagrant 1.8.4
- ホスト Windows10
- ゲスト CentOS7.1
- Python 3.5.1
方法
Matplotlibの設定ファイルの確認
インタラクティブモードで確認できる
python
>>> import matplotlib
>>> matplotlib.matplotlib_fname()
/hoge/hage/matplotlibrc
表示方法(backend)を変更
先ほどの関数で表示されたmatplotlibrcをテキストエディタで変更
# 40行付近
backend      : WebAgg

# 50行付近
webagg.port : 8888
webagg.port_retries : 50
webagg.open_in_browser : True
あとは普通に実行
import numpy as np
import matplotlib.pyplot as plt

def main():
        x = np.arange(-10,10)
        y = x * x
        y2 = x * 3

        p = plt.plot(x,y)
        p2 = plt.plot(x,y2)

        plt.show()

if __name__ == '__main__':
        main()
実行結果
localhost:8888にアクセスすると以下のように表示された。

